GUI - GitHub webhook setup by hand
Objective
To show how to configure and run a webhook on a server for a project on github.
Content
Introduction
These steps are based on the Digital Ocean's documentation to configure a Webhook for your repositories by hand in a Droplet, so we are also assuming that you have a site or app ready in the server and only waiting for the webhook.
We hope that you find this guide helpful, as we are trying to centralize all de documentation into a single file.
Configure the github repository
To ensure proper event notifications and their destination, it's crucial to create a webhook and a responding server. Begin by setting up the webhook, followed by configuring the server.
Start by logging into your GitHub account and selecting the repository you want to monitor. Next, click on the Settings tab located in the top menu bar and select Webhooks in the left navigation menu. Click on Add Webhook in the upper right corner and enter your account password if necessary. This will take you to a page that resembles the following:
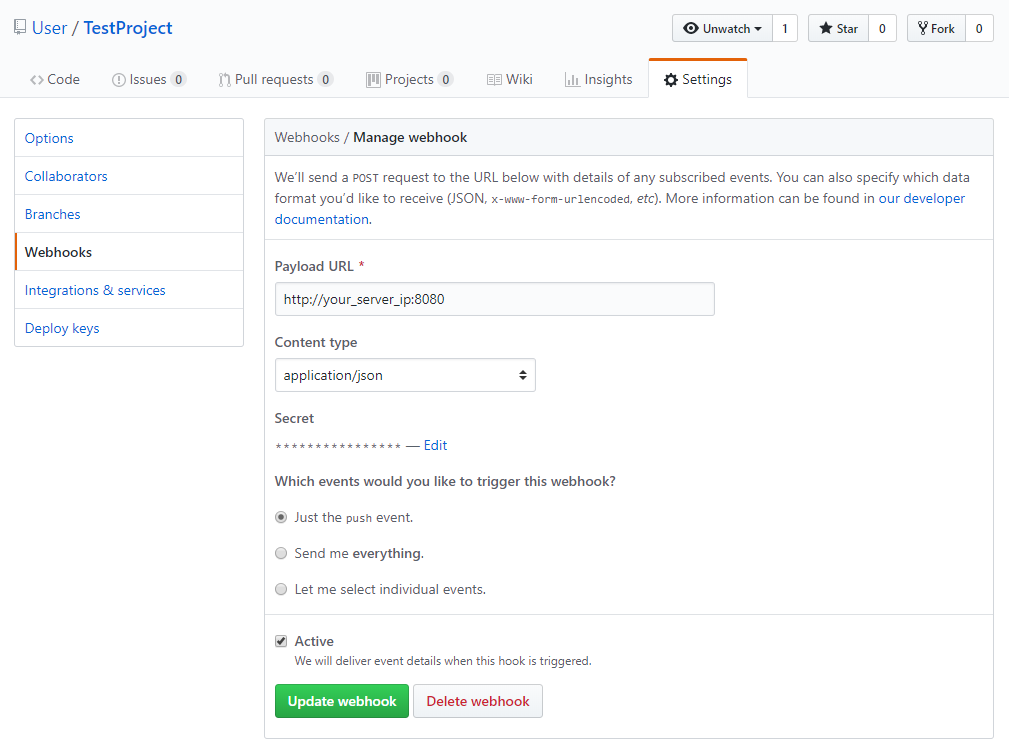
Follow these steps to create a webhook on GitHub:
- Go to the Settings tab of the repository you want to monitor.
- Click on Webhooks in the left navigation menu.
- Click on Add Webhook located in the top right corner of the page.
- In the Payload URL field, enter
http://[your-server-ip]:8080. This is the address and port of the Node.js server you'll create soon. - Change the Content type to application/json to ensure that the webhook sends JSON data.
- In the Secret field, enter a secret password for this webhook. You'll use this password in your Node.js server to validate requests and ensure that they came from GitHub.
- For Which events would you like to trigger this webhook, select just the push event. We only need the push event because that is when code is updated and needs to be synced to our server.
- Select the Active checkbox to enable the webhook.
- Review the fields and click on Add webhook to create it.
The ping will fail at first, but rest assured your webhook is now configured. Now let’s get the repository cloned to the server.
Creating the actions sciprt
We are going to create an sh script that will be executed by the NodeJS script, this sh script helps us to have a better control if we need to perform several actions. This sh script will be very specific to the actions that are required to be performed, however, here is an example of how to expose a node build to /var/www/[your-domain-name].
Make sure you have the necessary permissions/privileges to create, edit, and delete files and directories, as well as execute programs that require sudo privileges.
First, we make sure we centralize files under a common folder, for that, we execute:
# Navigate to your home directory
cd ~
# Create a new directory for your webhook scripts called NodeWebhooks
mkdir ~/NodeWebhooks
# Then navigate to the new directory
cd ~/NodeWebhooks
# Create a new file called as your prefer inside of the NodeWebhooks directory.
touch [webhook-file-name]-webhook.js
# Create a script file to handle actions performed by webhook
nano [sh-file-name].sh
#!/bin/bash

# Obtain absolute path to the current script
SCRIPT_DIR="$(cd "$(dirname "$0")" && pwd)"
# Obtain the path where the app/site will be exposed, you can replace the whole direction
PUBLISHED_DIR="/var/www/[your-domain-name]"
# Obtain the path where the git repository is located, you can replace the whole direction
REPO_DIR="/home/[username]/[path-to-repository]"

# Change to the expose directory and remove current files
cd ${PUBLISHED_DIR}
rm -r ./*

# Change to the repository directory
cd ${REPO_DIR}

# Redirect stdout and stderr to an autogenerated log file
LOG_FILE="${SCRIPT_DIR}/[log-file-name].log"
exec > "${LOG_FILE}" 2>&1

# Print current date of the log
echo $(date '+%d-%m-%Y %H:%M:%S')

# Update repository
git pull

# Install dependencies, you can use your own package manager like npm
yarn

# Build project, again, you can use your own package manager
yarn build ${PUBLISHED_DIR}

# End of the script
exit 0
You need to check what suits the best your needs for the script creation, sometimes you are going to need to build an application and then copy the content, sometimes you are going to need to add some flags for the build, so expect the previous file to change a lot from project to project.
The previous script will make it easy to debug if some error occurs, even more if you need to execute several actions in various repositories, because you can create an sh script per repository and check the specific logs for that file.
Creating the webhook script
To create the server, we'll need to write a Node.js script. The script will do the following:
- Launch a web server on port 8080.
- Listen for requests from the webhook.
- Verify the secret we specified when we created the webhook.
- Execute sh scripts.
Once we have written the script, we can run it on our server and it will be ready to listen for webhook requests from GitHub.
Copy/paste the following script, but make sure to replace your_secret_key and repo with the values that correspond to your project, then save and exit.
// Defines a variable to hold the secret you created in Step 1 which verifies that requests come from GitHub.
const secret = "[your-secret-here]";
// Stores the repository path, if several repositories need to act with the same webhook, then we recommend to give specific names per variable
const repo = "~/[path-to-your-repository]/";
// Path to the log file for the webhook
const logFilePath = "~/[path-to-your-webhook-log].log"

// Library to create http server
const http = require('http');
// Library used to compare secret with encripted data from github
const crypto = require('crypto');
// Library for sh script execution
const exec = require('child_process').exec;
// Library that will help to open sh files
const fs = require('fs')

http
  .createServer(function(req, res) {
    req.on('data', function(chunk) {
      let sig =
        'sha1=' +
        crypto
          .createHmac('sha1', secret)
          .update(chunk.toString())
          .digest('hex');

      if (req.headers['x-hub-signature'] == sig) {
       const logStream = fs.createWriteStream(logFilePath, {flags: 'a'});

       // Use your own sh file path
       const execProcess = exec("sh /home/[username]/NodeWebhooks/[sh-file-name].sh")
       // You can execute several sh file by concatenating executions with and inside the exec statement
       // An example could be exec("sh [paht-number-1.sh] && sh [path-number-2.sh]")

       execProcess.stdout.pipe(logStream);
       execProcess.stderr.pipe(logStream);

       execProcess.on('exit', (code) => {
        console.log("Script exited with code ${code}");
        logStream.end();
       });
      }
    });

    res.end();
  })
  // Replace with your own webhook port
  .listen(8080);
- Allow the port 8080 to communicate with outside web traffic:
sudo ufw allow 8080/tcp
sudo ufw enable
Installing the Webhook as a Systemd Service
systemd is a tool used by Ubuntu to manage tasks and services. To ensure that our webhook script starts automatically during boot, we will create a service using systemd commands. Here are the steps to create a new service file:
# You can name it as you wish but try to add 'webhook' to avoid future confusions
sudo nano /etc/systemd/system/[webhook-service-name].service
- Include the following code in the service file to instruct systemd on how to execute the script. This specifies the location of our Node.js script and provides information about our service.
[Unit]
Description=Github webhook
After=network.target

[Service]
Environment=NODE_PORT=8080
Type=simple
# Use your username
User=[username]
# Don't forget to put your user and replace the file name!
ExecStart=/usr/bin/nodejs /home/[username]/NodeWebhooks/[webhook-file-name]-webhook.js
Restart=on-failure

[Install]
WantedBy=multi-user.target
- Enable the new service so it starts when the system boots:
sudo systemctl enable [webhook-service-name].service
- Now Start the service:
sudo systemctl start [webhook-service-name]
- Ensure your service is running:
sudo systemctl status [webhook-service-name]
- You’ll see the following output indicating that the service is active:
Output
● [webhook-service-name].service - Github webhook
   Loaded: loaded (/etc/systemd/system/webhook.service; enabled; vendor preset: enabled)
   Active: active (running) since Fri 2018-08-17 19:28:41 UTC; 6s ago
 Main PID: 9912 (nodejs)
    Tasks: 6
   Memory: 7.6M
      CPU: 95ms
   CGroup: /system.slice/[webhook-service-name].service
           └─9912 /usr/bin/nodejs /home/strixdev/NodeWebhooks/[webhook-file-name]-webhook.js
You have successfully configured your webhook and service, and can now push new commits to your repository and see the changes reflected on your server.
Modifying a webhook file
If you ever need to modify a webhook or any service file, after making the modifications execute:
sudo systemctl stop webhook
sudo systemctl disable webhook.service
sudo systemctl enable webhook.service
sudo systemctl start webhook
The previous will force the system to load the new code in memory and execute the new one instead.
Versions
| Version | Description | Responsibles | Date |
|---|---|---|---|
| 1.0 | Guide creation | Ernesto Cabañas Albarran | 28/04/2023 |
| 1.1 | Modify guide to include logs | Emmanuel Antonio Ramirez Herrera | 22/12/2023 |
| 1.2 | Modify guide to include sh scripts | Emmanuel Antonio Ramirez Herrera | 26/12/2023 |
| 1.3 | Add examples, modify placeholders | Emmanuel Antonio Ramirez Herrera | 06/01/2024 |