GUI - React deployment
Objective
To show an efficient way to deploy a React application.
Content
Introduction
STRIXDEV develops several React applications and we needed a to-go documentation on how to do it in a good and efficient way, that's why we are placing our obtained knowledge here, to reproduce good results and not having to remember every single step.
Configure the basics in your droplet, hosting, ec2, whatever tool you're using
If you are using a Windows Operative system, we recommend you to install OpenSSH services to use from PowerShell
- Go to your service provider panel, create an ssh access door and access it from your computer by using
ssh [username]@[ip-address]and your password/ssh key - Create a non-root user, and log into it:
GUI - Create Debian user
GUI - Create Debian user
Objective
Describe a standarized way to create Linux Debian users.
Content
Introduction
For several reasons it is recommended to create an admin user different to the root user, that's why we are going to show the steps required to do so, remmember that these steps are intended for Debian based Linux distrubutions.
Prerequisites
You need to be logged into the server with your root user with superuser privileges and have access to the command line.
Create new user
You need to choose a new username + password for the user creation, we recommend storing this information, so you don't forget about it
# Create the non-root user
adduser username
# After executing the previous command you will be asked
# for some information, rememb you will need to keep track
# of username and password, write them down...

# Give sudo privileges to the non-root user
usermod -aG sudo username
Access to the new user
You have 2 options to access your newly created user:
- If you are still on your command line with your root user, you can use
sudo su username
- If you need to connect again to your server, now you can use your new account keys (username and password)
ssh [username]@[ip-address]
Versions
| Version | Description | Responsibles | Date |
|---|---|---|---|
| 1.0 | Guide creation | Emmanuel Antonio Ramirez Herrera | 12/12/2023 |
- Add some protection rules with basic firewall configuration
# Allow SSH secure communication
sudo ufw allow OpenSSH
# Make the previous rule take effect
sudo ufw enable
# Make sure OpenSSH is listed and Allowed
sudo ufw status
- Install nodejs and make sure it has execution privileges for all your users
GUI - Install NodeJS in Debian
GUI - Install NodeJS in Debian
Objective
Describe a standarized way to install NodeJS uder a Debian Linux distribution environment.
Content
Introduction
Serveral times you are going to need to use NodeJS for your application to work, but most of the OS won't have NodeJS installed by default, so you need to make sure to install it correctly.
Prerequisites
You need to be logged into the server with a user that has superuser privileges and have access to the command line.
Install NodeJS
If you just want the latest release for NodeJS to be installed, just execute these commands:
sudo apt update # Grant you are using most recent packages
sudo apt install nodejs # Install the latest/stable release
sudo apt install npm # Make sure npm gets installed
node --version # Check your NodeJS version
npm --version # Check your npm version
Different version from the latest
Sometimes the app development requires for a specific NodeJS version to be installed, then, you need to execute these comands:
# If you need any other node version...
sudo npm cache clean -f # Force to clean any npm cache
sudo npm install -g n # Install node helper
sudo n [version] # sudo n 18.15.0 as example
node --version # Check your node version
Give execution privileges to all users
You now have NodeJS installed, but it might only work with your current user, you can give privileges to all users by executing:
cd ~ # Go to root folder
mkdir ~/.npm-global # Create node global directory
npm config set prefix '~/.npm-global' # Global node_modules will be installed here
sudo nano ~/.profile # Create or modify profile file
--------------------
# Add these lines
# set PATH so global node modules install without permission issues
export PATH=~/.npm-global/bin:$PATH
--------------------
source ~/.profile # Use previous file as system variables
Versions
| Version | Description | Responsibles | Date |
|---|---|---|---|
| 1.0 | Guide creation | Emmanuel Antonio Ramirez Herrera | 12/12/2023 |
- Make sure you have git installed, otherwise, install it by using
sudo apt install git
Local/server repo configurations
Navigate to the root folder, create a new folder named GitRepos and navigate to the created folder. If the folder already exist, just navigate to it:
# Go to root folder
cd ~
# Create folder
mkdir GitRepos
# Move to created folder
cd ./GitRepos
Clone your repository and check it was created correctly, take note of the folder name, you are going to use it
# Clone your repository, it may ask for authentication
git clone [your-git-url]
# (Optional) List files to check repository name
ls ./
Create a folder under /var/www/ and give it your target domain name, if you have no domain name, use the IP address instead.
sudo mkdir /var/www/[your-domain-name]
Create a git webhook to allow continuous integration, use the path to the repository you cloned before and the target domain name, if you have no domain name, use the IP address instead.
GUI - GitHub webhook setup by hand
GUI - GitHub webhook setup by hand
Objective
To show how to configure and run a webhook on a server for a project on github.
Content
Introduction
These steps are based on the Digital Ocean's documentation to configure a Webhook for your repositories by hand in a Droplet, so we are also assuming that you have a site or app ready in the server and only waiting for the webhook.
We hope that you find this guide helpful, as we are trying to centralize all de documentation into a single file.
Configure the github repository
To ensure proper event notifications and their destination, it's crucial to create a webhook and a responding server. Begin by setting up the webhook, followed by configuring the server.
Start by logging into your GitHub account and selecting the repository you want to monitor. Next, click on the Settings tab located in the top menu bar and select Webhooks in the left navigation menu. Click on Add Webhook in the upper right corner and enter your account password if necessary. This will take you to a page that resembles the following:
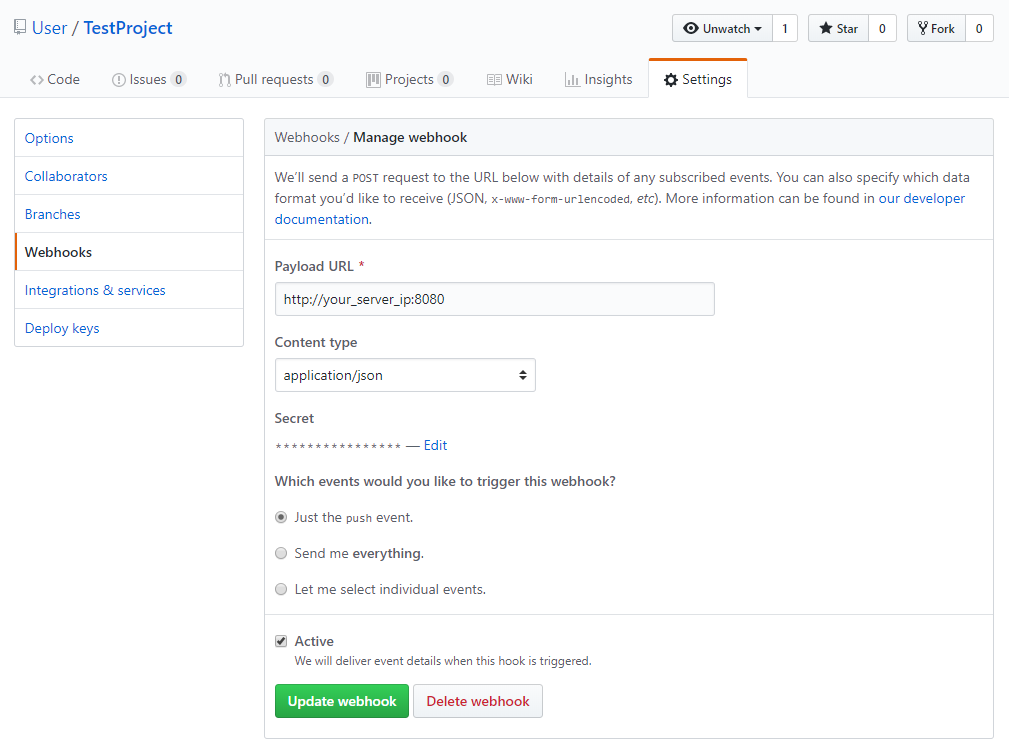
Follow these steps to create a webhook on GitHub:
- Go to the Settings tab of the repository you want to monitor.
- Click on Webhooks in the left navigation menu.
- Click on Add Webhook located in the top right corner of the page.
- In the Payload URL field, enter
http://[your-server-ip]:8080. This is the address and port of the Node.js server you'll create soon. - Change the Content type to application/json to ensure that the webhook sends JSON data.
- In the Secret field, enter a secret password for this webhook. You'll use this password in your Node.js server to validate requests and ensure that they came from GitHub.
- For Which events would you like to trigger this webhook, select just the push event. We only need the push event because that is when code is updated and needs to be synced to our server.
- Select the Active checkbox to enable the webhook.
- Review the fields and click on Add webhook to create it.
The ping will fail at first, but rest assured your webhook is now configured. Now let’s get the repository cloned to the server.
Creating the actions sciprt
We are going to create an sh script that will be executed by the NodeJS script, this sh script helps us to have a better control if we need to perform several actions. This sh script will be very specific to the actions that are required to be performed, however, here is an example of how to expose a node build to /var/www/[your-domain-name].
Make sure you have the necessary permissions/privileges to create, edit, and delete files and directories, as well as execute programs that require sudo privileges.
First, we make sure we centralize files under a common folder, for that, we execute:
# Navigate to your home directory
cd ~
# Create a new directory for your webhook scripts called NodeWebhooks
mkdir ~/NodeWebhooks
# Then navigate to the new directory
cd ~/NodeWebhooks
# Create a new file called as your prefer inside of the NodeWebhooks directory.
touch [webhook-file-name]-webhook.js
# Create a script file to handle actions performed by webhook
nano [sh-file-name].sh
#!/bin/bash

# Obtain absolute path to the current script
SCRIPT_DIR="$(cd "$(dirname "$0")" && pwd)"
# Obtain the path where the app/site will be exposed, you can replace the whole direction
PUBLISHED_DIR="/var/www/[your-domain-name]"
# Obtain the path where the git repository is located, you can replace the whole direction
REPO_DIR="/home/[username]/[path-to-repository]"

# Change to the expose directory and remove current files
cd ${PUBLISHED_DIR}
rm -r ./*

# Change to the repository directory
cd ${REPO_DIR}

# Redirect stdout and stderr to an autogenerated log file
LOG_FILE="${SCRIPT_DIR}/[log-file-name].log"
exec > "${LOG_FILE}" 2>&1

# Print current date of the log
echo $(date '+%d-%m-%Y %H:%M:%S')

# Update repository
git pull

# Install dependencies, you can use your own package manager like npm
yarn

# Build project, again, you can use your own package manager
yarn build ${PUBLISHED_DIR}

# End of the script
exit 0
You need to check what suits the best your needs for the script creation, sometimes you are going to need to build an application and then copy the content, sometimes you are going to need to add some flags for the build, so expect the previous file to change a lot from project to project.
The previous script will make it easy to debug if some error occurs, even more if you need to execute several actions in various repositories, because you can create an sh script per repository and check the specific logs for that file.
Creating the webhook script
To create the server, we'll need to write a Node.js script. The script will do the following:
- Launch a web server on port 8080.
- Listen for requests from the webhook.
- Verify the secret we specified when we created the webhook.
- Execute sh scripts.
Once we have written the script, we can run it on our server and it will be ready to listen for webhook requests from GitHub.
Copy/paste the following script, but make sure to replace your_secret_key and repo with the values that correspond to your project, then save and exit.
// Defines a variable to hold the secret you created in Step 1 which verifies that requests come from GitHub.
const secret = "[your-secret-here]";
// Stores the repository path, if several repositories need to act with the same webhook, then we recommend to give specific names per variable
const repo = "~/[path-to-your-repository]/";
// Path to the log file for the webhook
const logFilePath = "~/[path-to-your-webhook-log].log"

// Library to create http server
const http = require('http');
// Library used to compare secret with encripted data from github
const crypto = require('crypto');
// Library for sh script execution
const exec = require('child_process').exec;
// Library that will help to open sh files
const fs = require('fs')

http
  .createServer(function(req, res) {
    req.on('data', function(chunk) {
      let sig =
        'sha1=' +
        crypto
          .createHmac('sha1', secret)
          .update(chunk.toString())
          .digest('hex');

      if (req.headers['x-hub-signature'] == sig) {
       const logStream = fs.createWriteStream(logFilePath, {flags: 'a'});

       // Use your own sh file path
       const execProcess = exec("sh /home/[username]/NodeWebhooks/[sh-file-name].sh")
       // You can execute several sh file by concatenating executions with and inside the exec statement
       // An example could be exec("sh [paht-number-1.sh] && sh [path-number-2.sh]")

       execProcess.stdout.pipe(logStream);
       execProcess.stderr.pipe(logStream);

       execProcess.on('exit', (code) => {
        console.log("Script exited with code ${code}");
        logStream.end();
       });
      }
    });

    res.end();
  })
  // Replace with your own webhook port
  .listen(8080);
- Allow the port 8080 to communicate with outside web traffic:
sudo ufw allow 8080/tcp
sudo ufw enable
Installing the Webhook as a Systemd Service
systemd is a tool used by Ubuntu to manage tasks and services. To ensure that our webhook script starts automatically during boot, we will create a service using systemd commands. Here are the steps to create a new service file:
# You can name it as you wish but try to add 'webhook' to avoid future confusions
sudo nano /etc/systemd/system/[webhook-service-name].service
- Include the following code in the service file to instruct systemd on how to execute the script. This specifies the location of our Node.js script and provides information about our service.
[Unit]
Description=Github webhook
After=network.target

[Service]
Environment=NODE_PORT=8080
Type=simple
# Use your username
User=[username]
# Don't forget to put your user and replace the file name!
ExecStart=/usr/bin/nodejs /home/[username]/NodeWebhooks/[webhook-file-name]-webhook.js
Restart=on-failure

[Install]
WantedBy=multi-user.target
- Enable the new service so it starts when the system boots:
sudo systemctl enable [webhook-service-name].service
- Now Start the service:
sudo systemctl start [webhook-service-name]
- Ensure your service is running:
sudo systemctl status [webhook-service-name]
- You’ll see the following output indicating that the service is active:
Output
● [webhook-service-name].service - Github webhook
   Loaded: loaded (/etc/systemd/system/webhook.service; enabled; vendor preset: enabled)
   Active: active (running) since Fri 2018-08-17 19:28:41 UTC; 6s ago
 Main PID: 9912 (nodejs)
    Tasks: 6
   Memory: 7.6M
      CPU: 95ms
   CGroup: /system.slice/[webhook-service-name].service
           └─9912 /usr/bin/nodejs /home/strixdev/NodeWebhooks/[webhook-file-name]-webhook.js
You have successfully configured your webhook and service, and can now push new commits to your repository and see the changes reflected on your server.
Modifying a webhook file
If you ever need to modify a webhook or any service file, after making the modifications execute:
sudo systemctl stop webhook
sudo systemctl disable webhook.service
sudo systemctl enable webhook.service
sudo systemctl start webhook
The previous will force the system to load the new code in memory and execute the new one instead.
Versions
| Version | Description | Responsibles | Date |
|---|---|---|---|
| 1.0 | Guide creation | Ernesto Cabañas Albarran | 28/04/2023 |
| 1.1 | Modify guide to include logs | Emmanuel Antonio Ramirez Herrera | 22/12/2023 |
| 1.2 | Modify guide to include sh scripts | Emmanuel Antonio Ramirez Herrera | 26/12/2023 |
| 1.3 | Add examples, modify placeholders | Emmanuel Antonio Ramirez Herrera | 06/01/2024 |
Configure Nginx server
Make sure your folder under /var/www path has the right permissions
# Assign ownership to current user
sudho chown -R $USER:$USER /var/www/[your-domain-name]
# Change folder permissions
sudo chmod -R 755 /var/www/[your-domain-name]
Follow the Nginx guide to create the configuration file and paste the corresponding template:
- Standard configuration
- Proxied configuration
- Backend proxy
server {
        # Use your own application port
        listen 80;
        listen [::]:80;

        server_name [your-domain-name];

        # You can replace the whole direction to match yours
        root /var/www/[your-domain-name];
        index index.html index.htm index.nginx-debian.html;

        location / {
          try_files $uri $uri/ =404;
          # If your application is a SPA (Single-page application) use next line instead
          index index.html;
        }
      }
server {
        # Listen to default http port
        listen 80;
        listen [::]:80;

        server_name [your-domain-name];

        location / {
          # Use your own application port
          proxy_pass http://localhost:3000;
          proxy_http_version 1.1;
          proxy_set_header Upgrade $http_upgrade;
          proxy_set_header Connection 'upgrade';
          proxy_set_header Host $host;
          proxy_cache_bypass $http_upgrade
        }
      }
      # Use your own api url
      location /api/ {
      # Use your own backend port
			proxy_pass http://localhost:1337;
			proxy_http_version 1.1;
			proxy_set_header Connection '';
			proxy_set_header Host $host;
		}
GUI - Install and configure Nginx
GUI - Install and configure Nginx
Objective
To show an efficient way to install and configure Nginx to serve an application.
Content
Introduction
To first install Nginx can be a headache, every single project might have specific configuration needs, maybe you want to redirect from a url to another one, maybe you have a SPA (Single-page application) or maybe you want to modify a file that has SSL applied.
Prerequisites
You need to be logged into the server with a user that has superuser privileges and have access to the command line.
Installing Nginx
We recommend to make sure you have the latest packages by executing
sudo apt update
Make sure you are in the root folder by executing cd ~. Then, install Nginx with
sudo apt install nginx
Verify the installation by executing
nginx -v
Allow Nginx in firewall
Your server might be blocking all TCP communication by default, so we need to allow Nginx to handle this communication. You migh have already installed ufw, but if not, you need to install it by executing sudo apt-get install ufw.
Adjust firewall to allow http and https, in other words, allow Nginx Full
# Verify the applications that ufw is aware of
sudo ufw app list
# Allow http and https
sudo ufw allow 'Nginx Full'
# Apply previous changes
sudo ufw enable
# Check that OpenSSH and Nginx Full are allowed
sudo ufw status
Check everything is ok
Make sure nginx is up and running by executing next commands:
# The active status shoud be active and running
sudo systemctl status nginx

# This will show some IP addresses
ip addr show eth0 | grep inet | awk '{ print $2; }' | sed 's/\/.*$//'
If you copy the resulting IP address and paste it into your browser, you should see an nginx message
Creating the configuration file and enabling it
By default, Nginx will create a folder under /etc/nginx when installed, all configuration files will be written in the sites-available folder contained in the previously mentioned nginx folder. Every configuration file should be named after the domain name it will represent.
Move to /etc/nginx/sites-available and create the configuration file with:
# Move to sites-available folder
cd /etc/nginx/sites-available
# Create the configuration file, it doesn't need any file extension
touch ./[your-domain-name]
Create a symbolic link to enable the previous config file
sudo ln -s /etc/nginx/sites-available/[your-domain-name] /etc/nginx/sites-enabled/
Understanding basic Nginx configurations
Directives
Nginx is conformed by directives, where you can have simple directives (ending with a semicolon ;) and block directives (surronded by braces { }). A block directive can contain simple directives and other block directives. If a block directive can have other directives inside braces, it is called a context (examples: events, http, server, and location). Directives placed in the configuration file outside of any contexts are considered to be in the main context. The events and http directives can reside in the main context, server in http, and location in server.
To have a better understanding of the previous explanation, look the next configuration:
# Http belongs to main context (the config file is the main context)
http {
    # Server belongs to http context, as it is inside http
    server {
        # Location belongs to server context, as it is inside server
        location / {
            root /var/www;
        }
        location /images/ {
            root /data;
        }
    }
}
The location directive compares the given parameter (in this case /) against the current URI from the request and if there is a matching request, the URI will be added to the path specified in the root directive (in this case, to /var/www). If there are several matching location blocks Nginx selects the one with the longest prefix match. In the previous example, if you go to /images/ it will match / and /images/, as /images/ has the longest prefix match, it will be used.
Processing requests
Knowing the previous, we need to understand how Nginx processes the requests. Nginx first decides which server should process the request by comparing the host provided under the server_name directive, every server block is treated as a virtual server and if no server_name is provided, Nginx uses the empty name "" as the server name, allowing this server to process requests without the Host header field. Then it looks to the listen directive that sets the address and port for IP, or the path for a UNIX-domain socket on which the server will accept requests.
With all the previous, we can expand our example, we are going to remove the http block and let only the server block.
server {
    # Listen to port 8080
    listen 8080;
    # Catch all IPv6 addresses that listen to port 8080
    listen [::]:8080;
    # Sets the Host/s to catch the requests from, first name becomes the primary server name
    server_name example.com www.example.com;

    location / {
        root /var/www;
    }
    location /images/ {
        root /data;
    }
}
Setting a proxy server
There are several times where the intended usage for a specific location is to pass the requests to another server and retrieve the response from it. Imagine you have an aplication under www.myapplication.com and every request serves an HTML page, but whenever you receive some request to www.myapplication.com/api/ you want it to send the request to your backend server that you already have configured, then you need a proxy server like this:
server {
    listen 80;
    listen [::]80;

    server_name www.myapplication.com;

    location / {
        root /var/www;
    }
    location /api/ {
        proxy_pass www.myapplicationbackend.com:8080;
    }
}
If a keepalive connection is required (for constant frontend to backend communication for example) then you need to set proxy_http_version 1.1; directive. You can also set some headers by adding a proxy_set_header directive, for example proxy_set_header Host $host; or proxy_set_header Connection '';.
Giving specific files to serve
In the previous configuration documents we've used location with the root directive, that will try to 'build' the given request with the given root path, for example if you have:
location /home/ {
    root /assets/images;
}
A request to /home/front.png will be resolved into /assets/images/home/front.png.
But you might want to specify the files to deliver if a specific location has been reached, like when you have a SPA (Single-page application) and to do so you need to use the try_files directive that checks the existence of files in the specified order and uses the first found file for request processing.
server {
    listen 80;
    server_name someserver.com;
    root /var/www;

    location / {
        # This will try to find the given uri as a file name, if not found, it will render the index.html specified in the root directive of the previous context
        try_files $uri /index.html;
    }
}
Variables and further reading
As you've seen on some of the previous examples, we are using variables like $uri or $host, these variables are embeded variable names and can be used anywhere in the configuration files.
We know that these are only the basics to make Nginx configuratio and there are a lot of features and variables to check and understand from this tool, so if you ever need more in-depth of Nginx functionalities, we recommend you to go to the official documentation.
Set current configurations to start working
If you read Nginx documentation you will see that they tell you to use nginx -t and nginx -s reload commands to load new configurations, but if this does not work, then:
# Test configuration files are correct
nginx -t

# Restart nginx so it takes the changes
sudo service nginx restart
# But you can also use...
sudo systemctl restart nginx

# Check nginx status by writing:
sudo systemctl status nginx
Debugging
The first thing you should check is that you have nginx installed with nginx -v, then execute nginx -t to test your configuration files, if all files are correct, check that your files are under the sites-available folder and linked to the sites-enabled under the symbolic link.
You can also check the system status for nginx with sudo systemctl status nginx.
The final recommendation goes for the server configurations, where you can set the server logs file location:
server {
    # Set where the logs will be placed
    access_log /var/log/nginx/nginx.acess.log;
    error_log /var/log/nginx/nginx.error.log;
}
If you have any other tips or tricks with Nignx, please add them to this guide.
Versions
| Version | Description | Responsibles | Date |
|---|---|---|---|
| 1.0 | Guide creation | Emmanuel Antonio Ramirez Herrera | 03/01/2023 |
Make sure you've tested your config files and restarted the nginx service.
Add SSL certificate
Follow the SSL certificate installation over Nginx guide.
GUI - Add SSL to Nginx server
GUI - Add SSL to Nginx server
Objective
To show a standarized way to install and configure an SSL certificate with autorenewal to Nginx servers by using Certbot.
Content
Introduction
Prerequisites
You need to be logged into the server with your root user with superuser privileges and have access to the command line. You also need to already have an Nginx configuration up and running and python3 installed in your hosting service.
Install dependencies
We are going to install certbot and a Python3 helper that will help us to install SSL certificates over Nginx.
sudo apt install certbot python3-certbot-nginx
Add certificate
There are two ways to add a certificate, the first one is to execute a commmand that will trigger some questions that we need to answer with:
sudo certbot -d [your-domain-name] -d [your-other-domain-or-subdomain]
The other one is giving the answer to this questions through flags.
sudo certbot --nginx --redirect --agree-tos --no-eff-email -m youremail@mail.com -d domain.com -d www.domain.com
Enable autorenewal
The certificate has a limited ammount of time of availability, so, if you don't want to be manually generating new SSL certificates, you need to activate the autorenewal with:
sudo certbot renew --dry-run
Check SSL installation
The previous commands will make modifications under your Nginx config files, so if you want to check that SSL has been successfully configurated, you can go to /etc/nginx/sites-available/[your-domain-name] and check its contents.
Versions
| Version | Description | Responsibles | Date |
|---|---|---|---|
| 1.0 | Guide creation | Emmanuel Antonio Ramirez Herrera | 04/01/2023 |
Check that all the configurations are ok with sudo nginx -t and restart the nginx service with sudo systemctl restart nginx.
Furthermore
If you have followed all the previous steps and you still have some errors, please try to do it once again from the beginning, if you still have troubles, contact a teammate, and if both of you can't find a way to solve it, then you need to report this to the team.
Versions
| Version | Description | Responsibles | Date |
|---|---|---|---|
| 1.0 | Guide creation | Emmanuel Antonio Ramírez Herrera | 26/04/2023 |